The best dairy free and gluten free Crepe Recipe

What is it like?

- Tender

- Moist 

- Perfect for filling

See the Mushroom Filling recipe below the crepe recipe!

the best crepe recipe gluten free and dairy free

Recipe

Makes about 6 crepes, 10 minutes prep, 15 min cooking

2 eggs
1 cup low fat coconut milk or water
1 cup cashew flour (I bought it at Trader Joe's)
2 1/2 tbsp potato starch
1/4 tsp psyllium powder
1/4 tsp salt
about 1 tbsp coconut oil or preferred oil for cooking

Directions:

  1. Place all of the ingredients in the blender and blend until well combined, about 30 seconds.

  2. Allow to rest in the fridge for at least 1 hour, or until the next day.

  3. Place a wide, shallow pan over medium heat. Nonstick works the best, but you can use a different pan with additional oil. Add 1/2 tsp preferred oil to the pan and about 1/4 cup of batter. The crepe will begin cooking immediately after it hits the pan, so quickly tilt the pan so that the batter spreads evenly into a thin layer. If the crepe is too thick, add a little more water for the next one (a tsp at a time). Once the crepe looks firm on top, flip the crepe and cook for about 30 more seconds. Transfer to a plate to serve.

TIPS:

  • For savory crepes you can add black pepper, a spice, or a dried (1/4 tsp) or fresh herb (1/2 tsp), like parsley or thyme. For sweet crepes you can add 1 tsp vanilla and/or a dollop of your favorite sweetener.

  • I used to cook whole wheat crepes and the leftovers would become discolored. What is great about this recipe is that they look and taste fresh after sitting in the fridge overnight. Reheat in the microwave or on the stovetop.

Mushroom Filling for Crepes

gluten free dairy free crepe recipe
 

Recipe

Makes 4 crepes, 10 minutes prep, 5 minutes cooking

5 oz mushrooms (maitake are excellent but you can use white, crimini, shiitake, or preferred type)
extra virgin olive oil, as needed (about 3 tbsp)
2 oz smoked salmon, optional*
2 cloves garlic, optional
1/4 tsp dreid or fresh thyme
dash of salt

Directions:
Wash the mushrooms and allow to drain. Slice the mushrooms and sauté with garlic, thyme and salt over medium heat in a wide pan with 1 tsp olive oil until they are tender, about 5 minutes. Cook them in two batches so that they do not steam.
Place 1/4 of mushroom filling on a crepe with 1/2 oz salmon divided into very small pieces, and drizzle 1-2 tsp olive oil over filling. Roll up the crepe or fold it in quarters and serve warm.

*If you do not use salmon, you may want to add vegan cheese or regular cheese if you can tolerate it.

TIPS:
Do not over cook your mushrooms! You can test them as they sauté by removing one, allowing it to cool and then tasting it. It should have a bite to it. If it is totally limp, it will have lost a lot of its flavor and appeal.

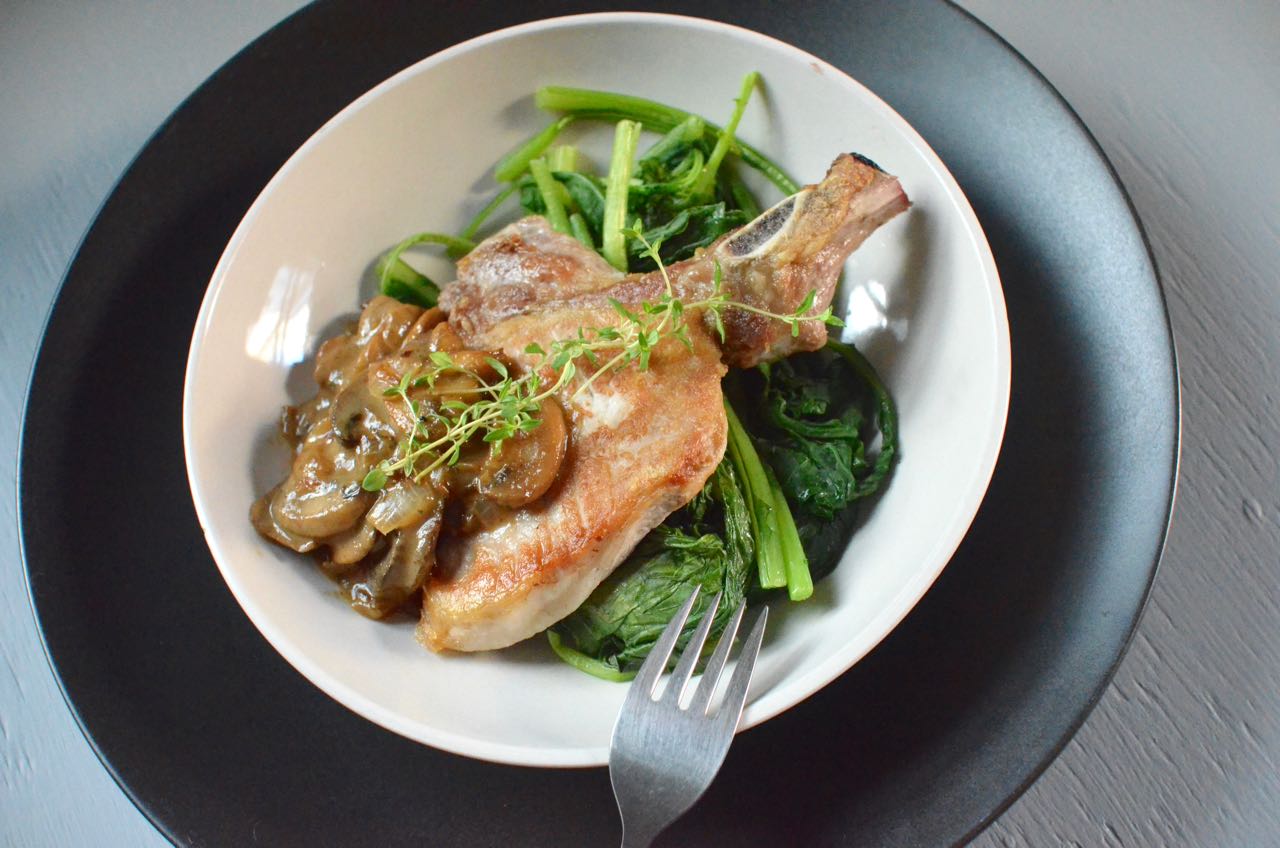
Pork Chops with Rich Mushroom Sauce

What is it like?

- Classy

- Decadent

- Delicious 

pork chops with mushrooms sauce recipe

Recipe

3 pork chops
1-2 tbsp coconut, grape seed oil or your preferred oil
1 onion, diced
8 oz mushrooms
3 cups chicken stock, divided OR your preffered stock
1/4 cup white wine
1/2 tsp dried tarragon, 1/2 tsp dried sage, 1 tsp fresh thyme leaves (or 1/2 tsp dried thyme), 1/4 tsp salt
thickener: mix 1/2 tbsp glutenous “sweet” rice flour with 1/2 cup stock
1 tbsp low sodium soy sauce (gluten free type)
2-3 tbsp coconut cream, or to taste

Directions:

  1. Heat a large pan (see photo) over medium high heat and add 2 tsp oil. Salt the pork chops with 1/4 tsp salt on both sides. Add chops to pan once it is hot. Allow chops to cook for about 4 minutes on each side, or until cooked. The chops will stick to the pan while they are browning. Once they are ready to flip, they will be easy to release and you will see red liquid start to release on top of the pork chops. Once they are cooked, set aside.
     
  2. Turn the heat down to medium and add 2 tsp oil to the same pan and add the chopped onion with the tarragon, sage, and thyme. Once caramelized, remove and set aside. Next, sauté the mushrooms in two batches with about  2 tsp of oil. Once cooked, set aside in a separate bowl.
     
  3. Turn the heat up to high for abut 20 seconds, then add the wine, followed by the chicken stock and bring to a simmer. (If you do not like the look of the brown bits that release from the bottom of the pan, you can strain the liquid and return it to the pan.) Add the onions/herbs and simmer the stock until it reduces in volume by about 1/3. Then whisk in the thickener and add the mushrooms. Simmer for 2 minutes, until thick. Then whisk in the coconut cream and serve over pork chops. 

The pork chops are excellent served with young broccoli rabe, which can be quickly steamed or sautéed over medium heat with your preferred oil and garlic until wilted. 

Fried Chicken

- Crispy

- Crunchy

- Perfect for dipping

Depositphotos_118014246_l-2015.jpg

Recipe

This fried chicken is crispy, moist, and flavorful. 

6 slices gluten free white sandwich bread OR regular if you eat wheat
1 1/2 lbs chicken thighs or breast, cut into about 1 x 3 inch strips
Combine: 1 cup cornstarch, 1 tsp paprika, 1/2 tsp dried thyme, 1 tsp dreid oregano, 1 tsp salt
Grape seed oil, as needed -- enough to cover 1/2 to 2/3 of the chicken height as it cooks in the pan (depends on size of pan you use)*
2 egg whites

Directions: 

Breadcrumbs - can make 1 week ahead and store in an air tight container.
1. Preheat oven to 350F. Slice the bread into 1 inch pieces, spread them out on a large baking sheet and toast until light golden brown. Allow to cool to room temperature. Once bread crumbs are completely cool and dry, pulse them in the food processor until the sizes are mostly rice kernel size with some more fine crumbs at the bottom. Place in a bowl with a few dashes of salt. 

Chicken - can prepare 1 day ahead.
2. To prepare the chicken rinse, dry, and slice it. Whisk together the cornstarch, paprika, thyme, oregano, and salt in a medium sized bowl. Dredge chicken in mixture. Only touch the wet part of the chicken with one "wet" hand and the dry part of the chicken with the other hand to avoid getting doughy fingers and interfering with the dredging process (see “what I learned from this recipe” below). If your hands become dough-y, wash and dry them. Do your best to cover all areas of chicken with cornstarch and then gently shake off excess and place chicken on a rack (or on a dry plate). Allow chicken to rest for 1/2 hour (or over night) until most of the white is “gone" because it has absorbed liquid from the chicken. At this point, the chicken should be dry or only slightly damp to the touch. 

Frying Chicken
3. Line 2 plates or a baking sheet with paper towels (where the cooked chicken can cool). In another bowl place 2 egg whites. Heat about 1/2 inch of oil in a large, shallow pan over medium high heat. Dredge the chicken in the egg white and then in bread crumbs. Spoon bread crumbs over the chicken making sure it is completely covered. Then place in hot oil. Oil should be just hot enough that the chicken sizzles as it cooks. It is important to cook chicken completely. I usually cook them 6 minutes per side, depending on the size of the piece (or longer). They are usually done when the breading becomes a golden brown. (To be sure they are done, remove from oil and insert a thermometer. When it reads 165F they are cooked.) 

4. Place the cooked chicken on the paper towel-lined plates, leaving 1-2 inches between pieces. If the pieces are crowded or touching each other, they will steam as they cool and lose their crispiness so be sure to give them space as they cool. Serve warm with ketchup or barbecue sauce. Re-heat leftovers in oven for crispiest results.

* You can substitute peanut, coconut or canola oil instead. 

What I learned when making this dish (and other fried dishes): 

  1. Choose a light, airy bread if that is the type of coating you prefer. I generally like to eat denser, whole grain breads, but for breading I choose gluten free white sandwich bread (like Glutino brand).

  2. Do not over toast the bread because you want the bread to do most of its cooking with the chicken in the oil. If the crumbs are already brown, they will become too dark and hard crunchy instead of a nice crispy outside.

  3. Grind the bread crumbs to uneven pieces. You want small pieces all the way to tiny pieces of bread crumbs (think rice kernel size to poppy seed size). These varying sizes help ensure that all of the surface area of the chicken is covered with bread crumbs. The large pieces make the majority of the crust while the small pieces fill in the spaces between them. This is why it also helps to gently place the chicken on the bread crumbs and then to flip it over and spoon crumbs over the top (the small bread crumbs usually sink to the bottom of the bread bowl so spoon them up and over the chicken will help small pieces fill the spaces between the larger bread crumbs on the chicken.)

  4. Allow the cornstarch to rest on the chicken. If you dip the chicken in the cornstarch and then the egg mixture, often the eggs mixture will “fall” off part of it if you have excess cornstarch on the chicken, which is easy to do. Allowing the cornstarch to rest, makes it less likely that there will be too much dry cornstarch.

  5. When breading the chicken, be sure to use one dry hand and one wet hand. You may be wondering what this means. When you bread food have you ever ended up with a dough-y mess on the ends of your fingers? You want to avoid this. This means the dough that should be sticking to your chicken is sticking to your fingers. If the dough comes off the chicken you may be left with parts of the chicken that are not covered properly, which can result in over-oily breading that is not crispy. The breading provides a layer around the chicken and you want it to be fully covered.

Lemon Tarragon Chicken

This recipe is delicious and very quick to make. It is my go-to when I have had a long day and just need a dinner that is refreshing and healthy (lemon and extra virgin olive oil are both known for their health benefits). Leftovers are great on their own or in chicken sandwiches.

* Images may differ slightly from recipe

* Images may differ slightly from recipe

Recipe

1.5 lbs boneless and skinless chicken, breast or thighs
1 lemon, juice (zest, optional)
1 tsp dried tarragon
1 tbsp extra virgin olive oil
salt and black pepper, to taste

Directions:
Preheat oven to 350 degrees. Rinse the chicken and remove large pieces of fat. Place pieces in a single layer in an 8 x 8 glass baking dish (or larger if needed). Squeeze lemon over chicken and drizzle olive oil over the top. Then sprinkle the tarragon, salt and black pepper over the chicken. Bake for 20 minutes or until done.

Minestrone Soup

Healthy and packed with flavor.

Depositphotos_71452563_l-2015.jpg

This recipe was inspired by the Sardinian diet, where people live into old age leading active, traditional lives in the hilly countryside of the Mediterranean.  It is both soothing and revitalizing and I enjoy it most served with warm bread dipped in olive oil and dukkah, a simple nut and spice blend. This recipe is equally enjoyable 1-3 days after it is made.

Recipe

1 onion
1 small bulb of fennel, include stalks and fronds
4 carrots
4 stalks celery
1/3 cup white wine
1 tsp salt, or to taste
1 1/2 tsp dried thyme
2 tsp fresh rosemary
2 tsp fresh sage
1/4 tsp cayenne, or to taste
black pepper, to taste
1 13 oz can tomatoes, diced
2 quarts chicken broth OR vegetable broth for vegan
2/3 cup quinoa
1/2 cup dry spaghetti, broken into 1 inch pieces, or small pasta

Directions:
Chop the veggies into the small pieces. Salute the onions, fennel, and 1/4 tsp salt for about 5 minutes. Then add carrots and celery and sauté for about 4 minutes. Thinly slice the sage, and rosemary and add to vegetables and stir. Add the wine and tomatoes with their juice, followed by the rest of the ingredients, minus the pasta. Cook for about 15 minutes and add the pasta when the quinoa is still al dente. Once pasta is al dente turn the heat off and allow the soup to rest for about 10 minutes before serving.

Garnish with lemon, parsley, or parmesan (optional).

Notes:
This recipe is flexible and how you like it depends on your taste. You can try substituting ingredients or herbs to make new combinations. First, however, I do recommend trying it as is for a dependable and delicious version of minestrone.